Acquired DSLR camera and the pictures are dark, dirty, “with ghosts head and handprints. If so, read this article. It will help to master the understanding of exposure. It’s really not so hard. Need to know a few elementary things about how to get the correct view. Let’s start with the definition of exposure. So, what is the exposure? The dictionary defines it as opens lens retention time of the shooting.
I will try to tell you simple words. Exposure- the amount of light passed through the lens is necessary to photograph all the details are clearly visible. The correct exposure is obtained when the dark detail visible in darker areas of the photo, and light yet completely white, that is to say, “burned” But this is an ideal case, suitable only when the image is displayed full brightness range. In practice, determining the correct exposure always choose between the scanner and the lack of detail in the shadows or try to determine the correct exposure in a substantial part of the frame in place.
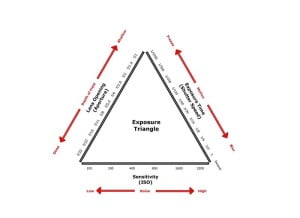
Understanding exposure in photography depends on three things: aperture, shutter speed, and ISO sensitivity. Otherwise, the triad called the exposure triangle. It is very easy to use. If one value we increase (decrease) in one side of the triangle, it’s too little and has a reduction (increase) in another.
Understanding exposure- aperture
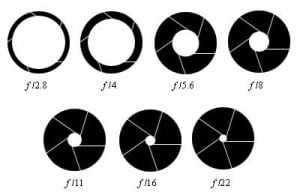
Aperture indicated by the numbers : f / 1 , f/1.4 , f / 2, f/2.8, f / 4, f/5.6, f / 8, f/11, f/16 , f/22 , f/32 , etc. These values need to memorize the order. The bottom line – the higher the number the smaller the aperture, that is to say, the less light passes through the lens. One of the main characteristics of the lens is its aperture, placed at the lowest possible f-number. The f-number is lower, the lighter the lens misses (the more expensive it is, and costs).
Keep in mind that simple lenses (which cost ± 300 pounds) To the claimed f/1.4 to f / 4 will generally be mild (point and shoot) with open (well, big) aperture. What is the purpose of the diaphragm? It provides a picture sharpness zone.
Understanding exposure- shutter speed
Exposure values are shown relative to one second , and is equal to : 1, 1/2 , 1/4 , 1/8 , 1/15 , 1/30 , 1/ 60, 1/125 , 1/ 250, 1/500 , 1 / 1000 , 1/2000 , 1/4000 of a second. These values are set in the camera. They also need to remember. Their essence – the shutter will be open only to the second. What is the purpose of maintenance? Exposure is responsible for the movement. It either stops (short exposure, for example. Sports photography) or spills (shutter speed, for example, silky water stream).
Understanding exposure ISO sensitivity
ISO Sensitivity set or a digital camera, or are used to film negative characteristic. ISO settings: 50, 100, 200, 400, 800, 1600, 3200, 6400, 12800, etc. The higher this number (800 or more), the more noise will be pictured (in the photos granulation will be higher), but at the same time will be needed and a lower amount of light to make the picture. It is also important to remember that if you increase the aperture one step (from f/2.8 to f / 4 ), the shutter speed or ISO will increase by 2 times (for example, from 1/500 to 1/250 sec. , Or ISO of 200 to 400), that is to say, change as well as one position. You can access any of the sides of the triangle, it is important to “offset” any remaining component. After such changes will still have the correct exposure.
Understanding exposure- values
Now, about one unwritten rule: the practice is to determine what minimum shutter speed when shooting out of hand required for certain lenses (shutter speed requirement). It turns out that if the lens focal length of 100 mm, the minimum shutter speed to get sharp photos is 1/100 of a second. The closest to this value is 1 / 125th It and use it. Give values that can be followed:35mm = 1/60, 100mm = 1/125, 200mm = 1/250, 300mm = 1/ 500, 600mm = 1/1000;Here is the 35mm 1/60 sec.
The importance of the lowest recommended value of the shooting hand. If the hand is shaking, it will have further increased. If the lens has a variable focal length to remove the maximum possible value of the fireplace, for example, 24-105/f4 lens, 105mm, not longer than 1/125 of a second. Let us consider an example. Suppose you take pictures of sports 70-200mm/f2.8 lens.
The camera offers the following exposure: f / 4 to 1/60 and ISO400. Is it appropriate for us? The first condition that requires maintenance is 1/250 of a second. In the second condition, let us recall the exposure triangle. And what we do (follow exposure triangle):First f / 4, 1/60 ISO400 (0 +0 +0 = 0)Second f / 4, 1/125 ISO800 (0-1 +1 = 0)3rd f / 4, 1/250 ISO1600 (0-2 +2 = 0)4th f/2.8 1/125 ISO400 (+1-1 +0 = 0)5th f/2.8 1/250 ISO800 (+1-2 +1 = 0)6th f/2.8 1/500 ISO1600 (+1-3 +2 = 0)Each of the six options makes the right exposure.
Which to choose?
Highlight Options (3, 5, and 6th) to ensure a minimum shutter speed requirement. As the sport shooting disciplines take pictures, my choice would be option No. 5. f/ 2.8 will pour more background, will make a narrower depth of field, focus, on what will be focused on the main subject. ISO800 is better in this case than ISO1600. The camera is also provided for exposure compensation, which means a photographer determined exposure shift, those values, which automatically calculates the camera. This correction is necessary because the camera exposure calculation principle is very simple.
The camera “thinks” that all objects are on average gray (18 % on a scale from black towards white). If the plot does not fit into this model, an automatic counting system exposures wrong, in which case the necessary exposure compensation. Usually, the photographer prefers the exposure compensation according to their experience, but general recommendations are as follows: light or dark objects in the object shooting against a bright background – +1 / 2 +1 … EV ( exposure value ), very bright – +1 … +2 EV, dark objects or a bright object on a dark background – 1/2 … -1 EV.
By the way, shooting snow – +3 EV compensation (otherwise it will be gray), white-skinned man (Europeans) – compensation of +1 EV. Modern cameras have several methods of measuring exposure (Yeah, it’s time to finally have access to the camera’s user manual). We will consider four more widespread. They differ in the size of the area from which the exhibition takes place measurement. Understanding exposure metering modes is also important, so let take a look at it.
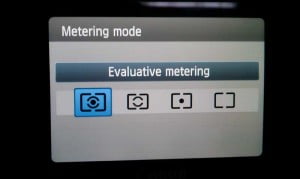
1. Evaluative (Matrix) meter
Measures all the surface in the frame. Easy to use if all the objects uniformly illuminate the entire frame, for example shooting landscapes. Hardly fit if the picture is bright and dark areas, and the main object a little bit worse than the rest of the frame. The result is a meaningful center of a very, very dark.
2. Mean Centre- meter
Carried out by the entire frame, but the highest-grossing choosing exposure is 60 % center frame area. In most cases, it is the central part of the most important photo. The most commonly used method of photography.
3. Partial metering
Measures 9% of the central area of the frame. Used when shooting against the sun, and when the background is much brighter than the subject.
4. Spot metering
There is only 3 % of the central area of the frame. As a partial measurement, this measurement method is suitable when the subject is poorly lit. In the picture of this item, you get a good exposure, but the background will be severely overexposed. So, I hope everything is clear about understanding exposure in photography. Compare the same situation and light images in various, but correct exposures.

Good shots for everyone! Thanks for your visit, you are one step further, to become the photo geek 🙂