In this tutorial, you are going to find out what high key photography exactly is and you are going to learn the key steps, equipment, and settings in order to achieve the desired outcome results.
Whether you are a beginner or a more experienced photographer, this high-key photography tutorial may add valuable extra knowledge to your photography skills. So, let’s see what this technique is all about.
What is High Key Photography?
High key photography utilizes unnatural lighting to eliminate most or every single harsh shadow in a picture. High key techniques were initially created as an answer for screens that could not appropriately show high contrast ratios, yet have evolved into a more stylistic choice for photographers and models alike.
High key photos ordinarily pass on a positive or cheery tone. This technique may be ideal for a subject that is interesting, carefree, or delightful.
If you pay attention, you will notice high key utilized consistently for model photography, relatively feminine subjects in nature or flowers. Another region ideal for the high key is item photography. For all intents and purposes, the brilliant way of the photograph truly highlights the item and can make for some interesting contrast. If we consider marketing practices, an item that appeared in white has a tendency to recommend that it is excellent in nature.
Lighting Equipment
Successfully shooting inside in high key may be difficult in the event that you don’t have the adequate equipment (outside on a splendid day can be less demanding and less expensive). In the event that you need to accomplish that studio, the white foundation looks, you may want to have some studio lighting close by.
Beginning with studio lighting can be costly. Numerous starter packs are accessible from various producers. Moreover, depending on the amount and quality of equipment you desire, you can hope to spend anywhere in the range of $200-$1700 and past.
This conversation about lighting could rapidly get to be complicated however I will attempt to keep it basic here. Fundamentally, you have two essential choices: constant lighting or a flash. Inside continuous lighting you can browse either tungsten, meaning hot lights, or fluorescent, meaning cool lights. Tungsten lights tend to produce hotter-looking light, on the other hand, fluorescent lights run genuinely cool and produce something more like sunlight.
The issue with both of these is that they are genuinely low-fueled, which can make it hard to obtain high key photography even if your lights are sufficient. On the other hand, flashes are more adaptable and capable and are in this way the main decision for some studios.
The Setup: High Key Photography Tutorial for Indoors
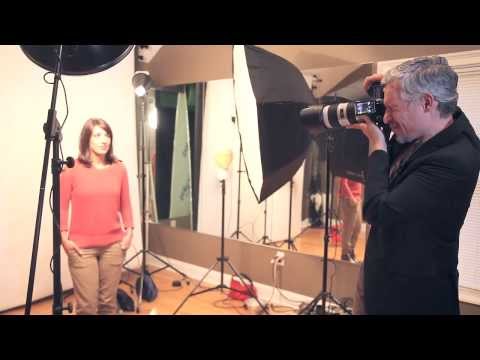
Once you have the necessary lighting equipment, you will have to set up your studio. The truth is that there are various approaches to shooting high-key photography. There are huge amounts of spots and methods to get a beautiful high-key shot. Yet this is the first option to give you a smart thought of a well-known and very popular setting for accomplishing the effect.
Preferably you will have no less than three lights, four on the off chance that you have the gear. You will additionally require a white setting or some likeness thereof. Numerous experts mount a 9 ft roll of paper on stands, and then move it down over the background and finally onto the floor. In case you are in a rush or maybe on a budget, you can have a go at utilizing a sheet (look for wrinkles) or an unfilled divider.
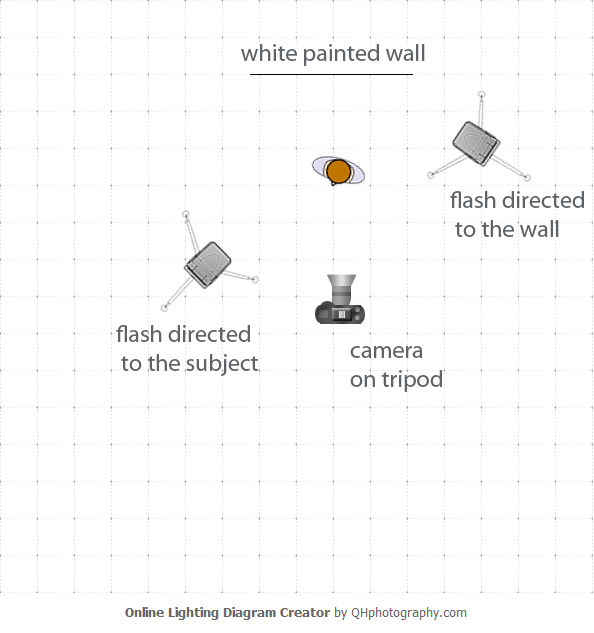
Place your subject in the focal point of the background and make a point to keep the shot’s edge inside of the limits of the paper so no holes are appearing. Then set up a key light and also a fill light. The key light is headed toward one side and it is your principal source of light on the subject. Ensure the lighting on the subject is approximately flat. As bizarre as that sounds, you should always remember that you are not aiming at differentiation here but rather at the brightness.
Having your key light to the other side will probably create harsh shadows on the inverse side of the subject. Here you set up a less bright light to smooth out some of those ranges. Shooting with just these two lights will create a dim, shadow-filled background. And since we are aiming for strong white, you have to kill these shadows by utilizing maybe a couple of lights calculated and pointed at your background.
One thing to keep an eye out for is the light bouncing off your scenery, which can bring about unusual coronas around your subject. In the meantime, you need to ensure you’re extinguishing the background enough to get the desired solid white.
Most simple setup I’ve used for a high key photo using two light sources and a white wall as a background
Got result like this

The Setup: High Key Photography Tutorial for Outdoors
– A camera (preferably one that shoots Raw)
– A large white sheet
– A-frame or support for the used sheet
You will also require a sunny day, so there is sufficient light, however, abstain from shooting in direct daylight due to the fact that there will be perhaps too many shadows and also too much contrast for the high key photography effects expected. A shady spot where the regular light falling on your subject and foundation will stay adjusted, regardless of the fact that the sun comes out, is a perfect place so you can continue shooting paying little mind to what the sun does.
Camera Settings
For the camera settings, set manual exposure mode to full control mode, with shutter speed at about 1/200 seconds and ISO. Choose a wide aperture, for example, f/5.6, and then take a couple of test shots, changing the force of the front flash until the presentation on the subject looks right.
While utilizing various flashes, the proportion between them is more critical than individual force settings. For the high key photography look, we require the foundation flashgun to overexpose the white wall, thus set this particular flash to a powerful output.
On the off chance that one flashgun is compatible then you can utilize your camera’s remote flash function in order to trigger it. If this is possible, set the second flashgun to the Slave mode. On the off chance that neither one of the flashes is good, utilize the pop-up flash at lower power and set both flashguns to the Slave mode mentioned.
Conclusion
In the event that you need to shoot high key inside, it is best to have some studio lighting accessible, ideally 3-4 flashes: two on the background and two on your subject. Likewise, ensure your camera’s settings are improved to let in a lot of light.
Ensure there’s sufficient to light up the scene significantly without fading the subject.
If you wish to shoot outdoors, the setup is very important. Pay attention to the direct sunlight and also, use the right camera settings.
Just to clear the high key photography technique once more before you try it, it tries to dispose of harsh shadows and result in a bright environment. It is, by and large, used to pass on a perky, interesting, or wonderful subject, however, can be controlled to impart various moods, ideas, or even concepts.